Kruger National Park isn’t just a bucket‑list safari destination — it’s a world‑class playground for wildlife photographers. With its vast landscapes, abundant species, and dramatic light, Kruger offers endless opportunities to create stunning images that capture the spirit of Africa. Whether you’re a budding enthusiast or a seasoned pro, planning your visit with photography in mind can transform your safari into a visual masterpiece.
In this guide, we explore how to tailor your Kruger experience for photography, covering the best times of day, gear tips, game drive strategies, composition techniques, and more — all designed to help you come home with unforgettable shots.
Why Kruger National Park is a photographer’s paradise
Kruger’s diverse habitats — from open savannah and riverine forests to grasslands and rocky outcrops — create varied backdrops for wildlife and landscape shots. Wildlife here is accustomed to vehicles, meaning animals often stay close and behave naturally, offering great opportunities for photographers to capture authentic moments in the wild.
The park’s extensive road network and regular guided drives allow access to prime wildlife encounters throughout the day, while photographic opportunities from rest camp viewpoints and rivers add to the appeal.
Timing your photography: golden hours and beyond
Optimal light for great photos
One of the most crucial elements of strong wildlife photography is light. In Kruger:
- Golden hours — the first two hours after sunrise and the last two hours before sunset — provide soft, warm light that enhances textures and colors in wildlife and landscapes alike.
- On overcast days, mid‑morning to mid‑afternoon can also yield rich images thanks to diffused lighting that reduces shadows.
Planning your game drives to coincide with these times maximizes your chances of capturing dramatic and beautifully lit shots.
Gear essentials for Kruger photography
Camera bodies and lenses
While almost any camera can capture wildlife in Kruger, having the right setup makes a big difference:
- Telephoto lenses (300–600mm range) are ideal for wildlife at a distance, helping you fill the frame with animals without disturbing them.
- Wide‑angle lenses (24–70mm) help you capture landscapes, environmental portraits, and storytelling scenes with context.
- Pack extra batteries and memory cards — remote shooting and rapid bursts can drain both quickly.
Accessories like a bean bag or monopod can help stabilise your shots when shooting from a vehicle, and a teleconverter can extend your reach when needed.
Choosing the right game drive experience
Guided vs. self‑drive photography
- Guided game drives: Expert guides know animal behavior, hotspots, and how to position the vehicle for the best shots. They communicate with other guides to keep you ahead of exciting sightings.
- Self‑drive safaris: Give you freedom to explore at your own pace — ideal if you want to linger at a scene or chase particular lighting. Vehicles also offer flexibility to mix routes and revisit sightings.
Both options can be photographers’ dreams; blending guided drives with self‑drive time often yields the richest opportunities.
Planning your route for better shots
Some areas and times of year are especially productive:
- Waterholes and rivers: Animals congregate here, especially in the dry season, offering dynamic interactions and reflective water shots.
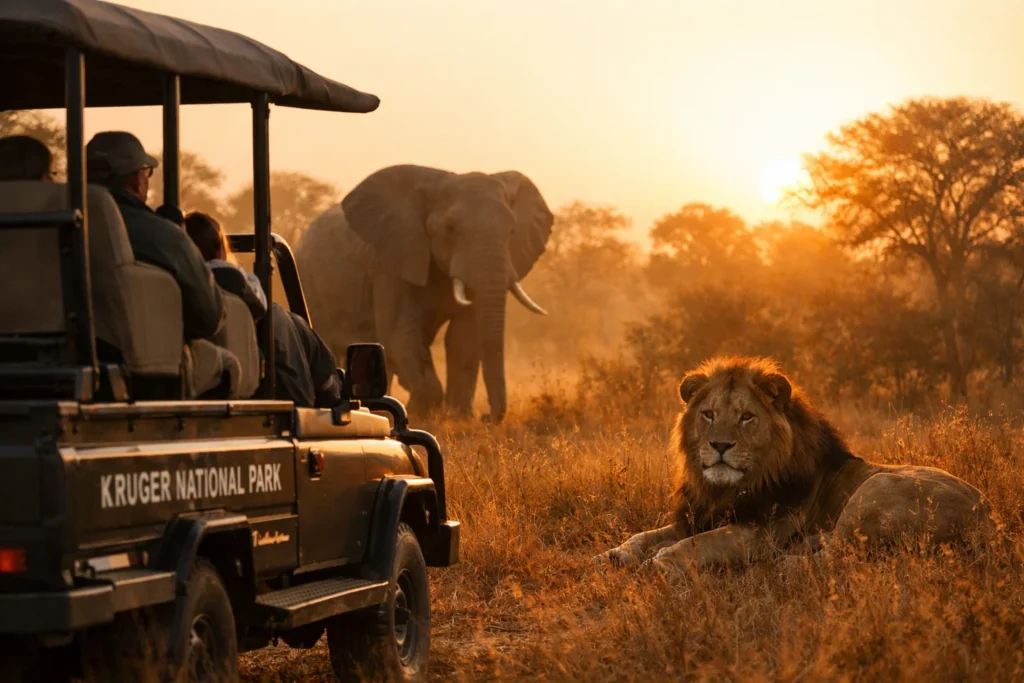
- Popular routes near Satara and Lower Sabie: Known for predator sightings and scenic backdrops that include elephants, lions, and buffalo.
- Lookouts and rest camps: Places like Olifants and Skukuza give elevated views and unique perspectives for broader compositions.
Researching routes and discussing sighting reports with guides or other drivers can help you anticipate where animals are most active.
Composition and storytelling techniques
Great wildlife photography isn’t just about capturing the animal — it’s about telling a story with your images. Here are some tips:
Rule of thirds and framing
Positioning your subject off‑centre often leads to more balanced, visually engaging photos. Use elements like trees, tracks, or rock formations to frame your subject creatively.
Animal behavior and motion
Anticipating wildlife behavior helps you capture meaningful interactions — like a lioness on the move or elephants at a waterhole. Shooting in bursts increases your odds of capturing the perfect moment.
Background and context
Avoid distracting backgrounds by choosing angles that separate your subject from cluttered foliage. Sometimes stepping back to include environmental context — such as a herd on the horizon or a dramatic sky — enhances the narrative of the shot.
Seasonal considerations for photographers
Different seasons in Kruger offer unique photographic opportunities:
- Dry season (May–September): Sparse vegetation and waterholes draw concentrated wildlife, making big game easier to spot.
- Green season (October–March): Lush landscapes, dramatic skies, and migratory birds add vibrant color and variety, though animals may be more dispersed.
Understanding these seasonal dynamics helps you choose the ideal timeframe based on the style of photos you want to capture.
Practical tips for a smoother photographic safari
- Arrive early and stay late: Wildlife is most active around dawn and dusk.
- Respect wildlife and rules: Stay in designated areas and obey park regulations — this protects both animals and your shooting opportunities.
- Be patient: Some of the most memorable shots come from waiting for the right moment rather than chasing every sighting.
Conclusion
Kruger National Park is a paradise for anyone passionate about wildlife photography. With careful planning, the right gear, and a keen eye for light and composition, your safari can yield images that linger long after your trip ends. From golden‑hour light to dramatic animal behavior, every moment in Kruger has the potential to become a powerful photograph. Embrace the adventure, be ready at all times, and let the landscape and its inhabitants tell their story through your lens.
For more tips on photography and safari planning, explore our other guides on capturing Africa’s wild heart.
Frequently Asked Questions
No — quality photos can be taken with a range of equipment, but telephoto lenses and proper support improve results.
Early morning and late afternoon provide the softest, most flattering light for images.
Yes — guided and self‑drive vehicles are both excellent for photography, as long as you follow park rules.
Absolutely — lush scenery and birdlife offer a different photographic experience even if animals are more dispersed.
Telephoto lenses (300mm+) are recommended for wildlife, while wide angles help capture landscapes.
Both — blending intimate animal portraits with broader context shots creates a richer photographic story.